Kemarin (03-09-2014) sekitar jam 11:15 Siang ada pelanggan yang beli Mouse Macro X7 R4
Dia sudah transfer ke BRI dari BNI.
Tetapi setelah saya cek sampai saat ini (04-09-2014) Sekitar Jam 14:45 / 1 hari lebih, kok dananya belum masuk-masuk ya?
Emangnya apakah selama ini prosesnya?
Wah Jadi Agak Ketar Ketir Nih..
Takutnya entar bisa dipakai utk modus penipuan nih..
Siapa sebenarnya Rasulullah itu, Ya Allah.. Sampai membuat aku begitu rindu padaNya..
Kamis, 04 September 2014
Rabu, 27 Agustus 2014
Grid Tricks - Clearer Search Results

Where is numbers 1, 2 & 3 Tricks? We can simply treat #1 as the More Objects inside a Cell blog, #2 as the Various Images II blog and #3 as the Transparent Grid blog.
I decided to start showing some more tricks I do on my side using grids which I deem will be useful for others as well. This is about making the search result clearer or more visible by highlighting the cell contents where a near match can be found. If not, it is very tiring for the user's eyes to trace where exactly those near matches are.
Actually, this entry is partly because of recent exchanges of ideas about the tricks and method in searching. What I wanted to show here is when you have several columns to look at and if the value in the search box can come from any of those columns, how can we easily distinguish where the near matches are? This trick aids visually the user just about that. Here is a sample code for this:
Local oForm
oForm=Newobject("Form1")
oForm.Show
Read Events
Return
Define Class Form1 As Form
Height = 390
Width = 770
AutoCenter = .T.
Caption = 'Clearer Search Results'
ShowTips = .T.
_cSearch = ''
Add Object grid1 As Grid With ;
GridLines = 0, ;
Height = 328, ;
Left = 10, ;
Top = 50, ;
Width = 750,;
GridLines = 3,;
DeleteMark = .F.,;
GridLineColor = Rgb(192,192,192),;
FontName = 'Tahoma',;
FontSize = 8
Add Object label1 As Label With ;
top = 15,;
left = 10,;
caption = 'Search',;
Backstyle = 0
Add Object Text1 As TextBox With ;
top = 10,;
left = 55,;
Height = 23,;
Width = 300,;
value = '',;
ToolTipText = 'Start typing to search matching records,'+;
' Double-click to clear search'
Procedure Load
Set Talk Off
Set Safety Off
Close Databases All
Select company,contact,Title From (Home(2)+;
"data\customer") Where .F. Into Cursor junk1 Readwrite
Endproc
Procedure grid1.Init
With This
.RecordSourceType = 6
.RecordSource = 'junk1'
.Column1.DynamicForeColor = ;
'IIF(thisform._cSearch $ UPPER(company),RGB(255,128,0),RGB(0,0,0))'
.Column2.DynamicForeColor = ;
'IIF(thisform._cSearch $ UPPER(contact),RGB(255,128,0),RGB(0,0,0))'
.Column3.DynamicForeColor = ;
'IIF(thisform._cSearch $ UPPER(title),RGB(255,128,0),RGB(0,0,0))'
.Column1.DynamicFontBold = ;
'IIF(thisform._cSearch $ UPPER(company),.T.,.F.)'
.Column2.DynamicFontBold = ;
'IIF(thisform._cSearch $ UPPER(contact),.T.,.F.)'
.Column3.DynamicFontBold = ;
'IIF(thisform._cSearch $ UPPER(title),.T.,.F.)'
Endwith
Endproc
Procedure Text1.DblClick
This.Value = ''
Zap In junk1
Thisform.grid1.Refresh
Endproc
Procedure Text1.InteractiveChange
Local lcSearch
lcSearch = Upper(Alltrim(This.Value))
Thisform._cSearch = m.lcSearch
Select company, contact, Title From Home(2)+"data\customer" ;
Where Upper(cust_id+company+contact+Title);
LIKE '%'+m.lcSearch+'%' Into Cursor junk2 NOFILTER
Select junk1
Zap In junk1
Append From Dbf('Junk2')
Go Top
Thisform.grid1.Refresh
Endproc
Procedure Destroy
Clear Events
Endproc
Enddefine
The tricks employed here is via using DynamicForeColor and DynamicFontBold properties of a column. Another thing you have to notice here is my use of a form property because local variables go out of scope.
Well, those are just 3 simple things to look for. Now go employ this trick on your end.
Cheers!
More Objects Inside a Grid Cell
In pursuit of making the appearances of our app more powerful, I decided to make my grid more appealing by way of showing several objects inside a cell. And that can be attained via containers plus manipulating .controlsource(s).
Let us say I have this SQL SELECT:
SELECT fld1, fld2, fld3, fld4, fld5, fld6, fld7, fld8, fld9, fld10 from mytable into cursor junk nofilter
So I have 10 fields above. Normally we would have 10 columns as well to show everything inside a grid, a column for each field, a record for each row. Now, I wanted to show only 2 columns where fields 1 to 5 will all be cramped inside Column1 and the rest on Column2. Here is how to do it.
By default, a grid will bind itself to the current active table/cursor and will follow the field arrangement like in the above fld1, fld2.....etc. Ignore the sequence of the fields because it will be useless now.
a. Create container1 on form. It is easier to manipulate the appearances and positions of objects inside the container when you do it on form (outside the grid). We will put that later inside the grid
b. Inside Container1, add 5 textboxes. Play with controlsource like:
text1.ControlSource = junk.fld1
text2.ControlSource = junk.fld2
* and so on, you can add some more objects like labels if you like
c. Play with those objects' borderlines, opacity, etc. to suit your taste
d. Click on another object in the form then click back on container. Make the container borderwidth = 0, backstyle = 0
e. When everything seems to satisfy you, press Ctrl+C
f. Press Ctrl then click on the grid to turn it into edit mode. Click on the target column
g. Paste on the target column the container object via Ctrl+V
h. Go back to that Column1 and change its CurrentControl to your container instead of the default Text1.
i. Set its Sparse setting to .F.
Repeat the same process for Column2 (create container, etc.) up to letter i. Run your form and that is it. Enjoy!
Here is how mine looks:

Let us say I have this SQL SELECT:
SELECT fld1, fld2, fld3, fld4, fld5, fld6, fld7, fld8, fld9, fld10 from mytable into cursor junk nofilter
So I have 10 fields above. Normally we would have 10 columns as well to show everything inside a grid, a column for each field, a record for each row. Now, I wanted to show only 2 columns where fields 1 to 5 will all be cramped inside Column1 and the rest on Column2. Here is how to do it.
By default, a grid will bind itself to the current active table/cursor and will follow the field arrangement like in the above fld1, fld2.....etc. Ignore the sequence of the fields because it will be useless now.
a. Create container1 on form. It is easier to manipulate the appearances and positions of objects inside the container when you do it on form (outside the grid). We will put that later inside the grid
b. Inside Container1, add 5 textboxes. Play with controlsource like:
text1.ControlSource = junk.fld1
text2.ControlSource = junk.fld2
* and so on, you can add some more objects like labels if you like
c. Play with those objects' borderlines, opacity, etc. to suit your taste
d. Click on another object in the form then click back on container. Make the container borderwidth = 0, backstyle = 0
e. When everything seems to satisfy you, press Ctrl+C
f. Press Ctrl then click on the grid to turn it into edit mode. Click on the target column
g. Paste on the target column the container object via Ctrl+V
h. Go back to that Column1 and change its CurrentControl to your container instead of the default Text1.
i. Set its Sparse setting to .F.
Repeat the same process for Column2 (create container, etc.) up to letter i. Run your form and that is it. Enjoy!
Here is how mine looks:

Using FoxTray ActiveX control: System Tray Icon and menu attached to VFP form
| Before you begin: |
| Download an archive file with FoxTray.ocx. Check the Readme file. Register control before testing the VFP code below: REGSVR32 FoxTray.ocx (use full path to the file).This control has been created in VB6 and so -- alas! -- requires certain VB support files installed on your computer: MSVBVM60.DLLSee also: |
#DEFINE ccIcon "house.ico" && replace with valid ICO file name PUBLIC objForm objForm = CreateObject("Tform") objForm.Visible = .T. DEFINE CLASS Tform As Form Width=400 Height=240 MaxButton=.F. MinButton=.F. Autocenter=.T. Caption = " Using Systray icon and menu" ADD OBJECT cmdShowIcon As CommandButton WITH; Caption="Show Icon", Width=100, Height=27,; Left=20, Top=20 ADD OBJECT cmdHideIcon As CommandButton WITH; Caption="Hide Icon", Width=100, Height=27,; Left=20, Top=56 ADD OBJECT chPopup As CheckBox WITH; Caption=" Popup enabled", Value=.T.,; Left=240, Top=20, Autosize=.T., BackStyle=1 PROCEDURE Init THIS.AddTrayCtrl PROCEDURE AddTrayCtrl LOCAL lErr ON ERROR lErr = .T. THIS.AddObject("FoxTray", "TFoxTray") ON ERROR IF lErr = MessageB("ActiveX control not registered " + Chr(13) +; "or VB support not available. " + Chr(13) + Chr(13) +; "Class: FoxTrayCtl.cFoxTray " + Chr(13) +; "File: FoxTray.ocx " + Chr(13) +; "VB support: msvbvm60.dll ", 48, " FoxTray Control") ENDIF PROCEDURE cmdShowIcon.Click WITH ThisForm.FoxTray .IconSource = ccIcon .ShowIcon ENDWITH PROCEDURE cmdHideIcon.Click ThisForm.FoxTray.HideIcon ENDDEFINE DEFINE CLASS TFoxTray As OLEControl OleClass="FoxTrayCtl.cFoxTray" PROCEDURE Init WITH THIS .IconSource = ccIcon .IconTip = "FoxPro App" .ShowIcon * setting popup items, max number = 5 .GetPopupItem(1).Caption = "Settings" .GetPopupItem(2).Caption = "About" .GetPopupItem(3).Caption = "-" && separator .GetPopupItem(4).Caption = "Close form" .GetPopupItem(5).Caption = "\Exit" && item disabled ENDWITH PROCEDURE BeforePopupActivate PARAMETERS lResult lResult = ThisForm.chPopup.Value && .F. cancels popup activation PROCEDURE OnPopupItemSelected LPARAMETERS lnItem, lcCaption DO CASE CASE lnItem = 2 = MessageB("System Tray Icon and Menu Control ", 64, " About") CASE lnItem = 4 ThisForm.Release CASE lnItem = 5 IF MessageB("Exit FoxPro? ", 32+4, " FoxTray Control") = 6 QUIT ENDIF OTHER = MessageB("Popup item selected: " + LTRIM(STR(lnItem)) +; ", [" + lcCaption + "]") ENDCASE ENDDEFINE * * * *|The FoxPro code contains no Win32 functions, all calls moved *|to the ActiveX part: *| *| LoadImage *| ExtractAssociatedIcon *| DestroyIcon *| GetModuleFileName *| Shell_NotifyIcon *| CallWindowProc *| GetWindowLong *| SetWindowLong *| CopyMemory *| GetCursorPos *| SetRectEmpty *| CreatePopupMenu *| TrackPopupMenuEx *| InsertMenuItem |
Senin, 25 Agustus 2014
Pagi-Pagi Sudah Dihadang Kemacetan
Malang (ANTARA News) - Ratusan sopir angkutan kota dari delapan trayek atau jalur di Kota Malang, Jawa Timur, Selasa mogok beroperasi karena menolak kebijakan jalur satu arah di Jalan Semeru dan Jalan Kawi.
Aksi mogok ratusan sopir angkutan kota (angkot) tersebut dilakukan dengan memarkir kendaraan mereka di sepanjang Jalan Kawi, sehingga arus kendaraan macet total di kawasan tersebut, termasuk di Jalan Semeru, Arjuno, Jalan Tenis, Ijen, dan Merapi.
Akibat mogoknya ratusan sopir angkot dari delapan jalur itu sejak sekitar pukul 06.00 WIB, karyawan maupun pekerja di berbagai instansi di daerah itu terpaksa diangkut truk kepolisian.
Kedelapan jalur angkot yang terdampak penerapan jalur satu arah itu, adalah Lanndungsari-Gadang (LG), Gadang-Landungsari (GL), Mulyorejo-Madyopuro (MM), Arjosari-Tidar (AT), Arjosari-Kandungsari (AL), Arjosari-Dinoyo-Landungsari (ADL), Landungsari-Dinoyo-Gadang (LDG), dan Madyopuro-Karang Besuki (MK).
Salah seorang sopir angkot jalur AT, Bambang, mengatakan aksi mogok beroperasi tersebut untuk menolak pelaksanaan uji coba jalur satu arah.
"Sopir angkot dari delapan jalur ini minta agar ada jalur khusus untuk mikrolet (angkot) seperti yang diberlakukan di kawasan lingkar Universitas Brawijaya (UB)," ujarnya.
Bambang mengaku para sopir akan melakukan mogok beroperasi hingga tuntutannya dikabulkan. "Nanti juga ada perwakilan dari paguyuban mikrolet melakukan pertemuan dengan dewan (DPRD Malang, red)," katanya.
Meski mendapat penolakan, bahkan ratusan sopir angkot melakukan mogok operasi tak menyurutkan niat Wali Kota Malang Moch Anton untuk melaksanakan uji coba satu arah di Jalan Kawi dan Semeru tersebut karena pemberlakuan kebijakan tersebut sudah melalui kajian mendalam, termasuk solusi pengalihan jalur angkutan yang terkena dampaknya.
"Dampak jalur satu arah hanya berada di sepanjang Jalan Semeru hingga Kawi dan sebelah utara aserta selatan Stadion Gajayana. Semua sudah kita siapkan termasuk jalur pengalihan, sehingga sopir angkutan tidak perlu khawatir," tegas Anton.
Menurut dia, sopir dan para pemilik angkutan seharusnya tidak perlu melakukan aksi protes, sebab kebijakan jalur satu arah merupakan upaya Pemkot Malang untuk mengatasi kemacetan di kawasan tersebut.
"Kami dituntut masyarakat untuk mengatasi kemacetan, tetapi mengapa kebijakan kami justru diprotes. Jika alasan angkutan tak setuju karena takut kehilangan penumpang, itu tidak benar karena penumpang tetap akan naik angkutan di jalur pengalihan," tandasnya.
Dalam uji coba jalur satu arah tersebut, Dinas Perhubungan (Dishub) Kota Malang menyiapkan sedikitnya 90 personel yang terdiri dari petugas Dishub, kepolisian dan TNI. Puluhan Personel itu bertugas untuk berjaga di jalur pengalihan, serta menghalau kendaraan yang melawan arus.
Meski ada penolakan dari sopir angkot, bahkan unjuk rasa, Dishub tetap melakukan uji coba jalur satu arah tersebut. "Apapun risikonya akan tetap kami hadapi, termasuk unjuk rasa dan aksi mogok yang dilakukan sopir," kata Kepala Dishub Kota Malang Wahyu Setianto.
Minggu, 24 Agustus 2014
Windows 9
Wah baru aja Ada Windows 8 udah mau lahir lagi Windows 9..
semoga di windows 9 menjadi OS yang powerfull tidak seperti adiknya..si 8 itu...
Sebelum Lihat bocoran dari Windows 9 nya kita lihat dulu OS windows pendahulunya agar mengingatkan agan dan sista
CALIFORNIA - Baru-baru ini beredar tampilan gambar konsep Windows 9. Terdapat desain baru yang tampak berbeda dengan gaya metro design ala Windows 8, serta dominasi latar belakang berwarna biru.
Dilansir Softpedia, Minggu (17/3/2013), meskipun Windows 8 baru diluncurkan pada Oktober 2012, namun kini tampaknya semua pengguna tengah melihat versi Windows yang lebih baru lagi. Kabarnya rilis pada musim panas tahun ini, Windows 9 diharapkan menyuguhkan fitur menarik ketimbang Windows 8.
Berdasarkan laporan terbaru, Windows 9 dijadwalkan meluncur pada November 2014. Versi terbaru ini akan memberikan berbagai macam perbaikan platform Windows, termasuk peningkatan pada Metro UI (user interface), yang sebelumnya banyak dikritik oleh para pengguna awal.
Pengguna DeviantArt Softboxindia telah menciptakan sebuah konsep yang menunjukkan tampilan File Explorer di Windows 9. Gambar ini menunjukkan adanya pengelolaan file yang bisa diakses dengan gaya penelusuran (browse local drives).
Gambar ini juga memberikan bayangan terkait Microsoft yang siap untuk memigrasikan desain klasik Windows Explorer ke tampilan yang lebih modern. Microsoft juga kabarnya akan menampilkan versi update terbaru yang dilengkapi dengan Ribbon.
Untuk Bocoran Gambarnya, Silahkan cekidot disini :
Sabtu, 23 Agustus 2014
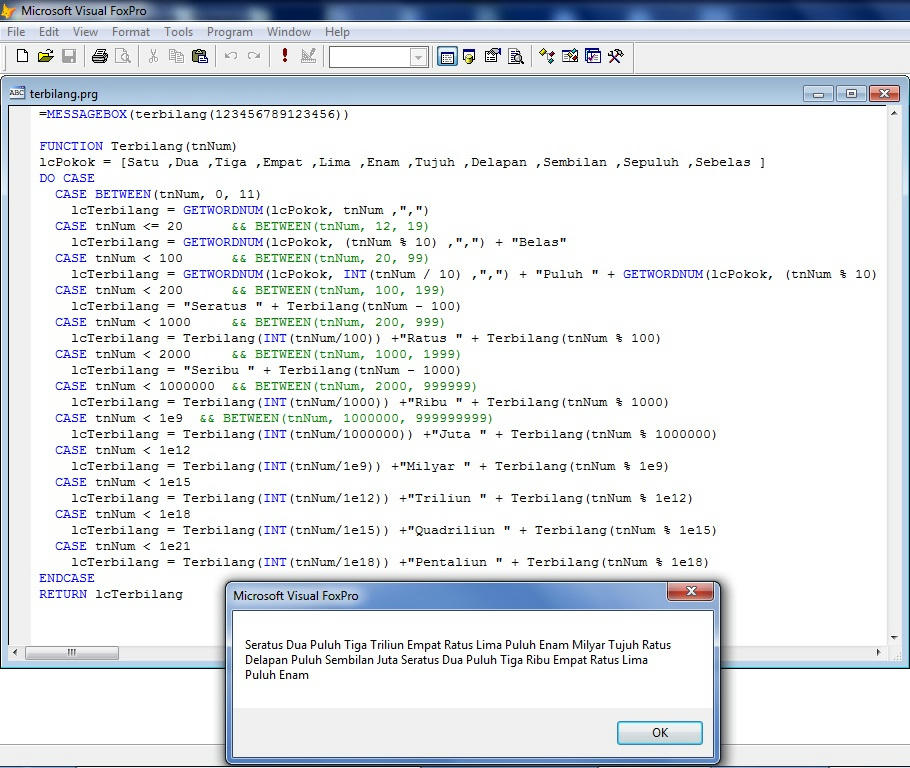
Fungsi Terbilang Sampai Triliyunan
FUNCTION Terbilang(tnNum)
lcPokok = [Satu ,Dua ,Tiga ,Empat ,Lima ,Enam ,Tujuh ,;
Delapan ,Sembilan ,Sepuluh ,Sebelas ]
DO CASE
CASE BETWEEN(tnNum, 0, 11)
lcTerbilang = GETWORDNUM(lcPokok, tnNum ,",")
CASE tnNum <= 20 && BETWEEN(tnNum, 12, 19)
lcTerbilang = GETWORDNUM(lcPokok, (tnNum % 10) ,",") + "Belas"
CASE tnNum < 100 && BETWEEN(tnNum, 20, 99)
lcTerbilang = GETWORDNUM(lcPokok, INT(tnNum / 10) ,",") + "Puluh " +;
GETWORDNUM(lcPokok, (tnNum % 10) ,",")
CASE tnNum < 200 && BETWEEN(tnNum, 100, 199)
lcTerbilang = "Seratus " + Terbilang(tnNum - 100)
CASE tnNum < 1000 && BETWEEN(tnNum, 200, 999)
lcTerbilang = Terbilang(INT(tnNum/100)) +"Ratus " + Terbilang(tnNum % 100)
CASE tnNum < 2000 && BETWEEN(tnNum, 1000, 1999)
lcTerbilang = "Seribu " + Terbilang(tnNum - 1000)
CASE tnNum < 1000000 && BETWEEN(tnNum, 2000, 999999)
lcTerbilang = Terbilang(INT(tnNum/1000)) +"Ribu " + Terbilang(tnNum % 1000)
CASE tnNum < 1e9 && BETWEEN(tnNum, 1000000, 999999999)
lcTerbilang = Terbilang(INT(tnNum/1000000)) +"Juta " + Terbilang(tnNum % 1000000)
CASE tnNum < 1e12
lcTerbilang = Terbilang(INT(tnNum/1e9)) +"Milyar " + Terbilang(tnNum % 1e9)
CASE tnNum < 1e15
lcTerbilang = Terbilang(INT(tnNum/1e12)) +"Triliun " + Terbilang(tnNum % 1e12)
CASE tnNum < 1e18
lcTerbilang = Terbilang(INT(tnNum/1e15)) +"Quadriliun " + Terbilang(tnNum % 1e15)
CASE tnNum < 1e21
lcTerbilang = Terbilang(INT(tnNum/1e18)) +"Pentaliun " + Terbilang(tnNum % 1e18)
ENDCASE
RETURN lcTerbilang
lcPokok = [Satu ,Dua ,Tiga ,Empat ,Lima ,Enam ,Tujuh ,;
Delapan ,Sembilan ,Sepuluh ,Sebelas ]
DO CASE
CASE BETWEEN(tnNum, 0, 11)
lcTerbilang = GETWORDNUM(lcPokok, tnNum ,",")
CASE tnNum <= 20 && BETWEEN(tnNum, 12, 19)
lcTerbilang = GETWORDNUM(lcPokok, (tnNum % 10) ,",") + "Belas"
CASE tnNum < 100 && BETWEEN(tnNum, 20, 99)
lcTerbilang = GETWORDNUM(lcPokok, INT(tnNum / 10) ,",") + "Puluh " +;
GETWORDNUM(lcPokok, (tnNum % 10) ,",")
CASE tnNum < 200 && BETWEEN(tnNum, 100, 199)
lcTerbilang = "Seratus " + Terbilang(tnNum - 100)
CASE tnNum < 1000 && BETWEEN(tnNum, 200, 999)
lcTerbilang = Terbilang(INT(tnNum/100)) +"Ratus " + Terbilang(tnNum % 100)
CASE tnNum < 2000 && BETWEEN(tnNum, 1000, 1999)
lcTerbilang = "Seribu " + Terbilang(tnNum - 1000)
CASE tnNum < 1000000 && BETWEEN(tnNum, 2000, 999999)
lcTerbilang = Terbilang(INT(tnNum/1000)) +"Ribu " + Terbilang(tnNum % 1000)
CASE tnNum < 1e9 && BETWEEN(tnNum, 1000000, 999999999)
lcTerbilang = Terbilang(INT(tnNum/1000000)) +"Juta " + Terbilang(tnNum % 1000000)
CASE tnNum < 1e12
lcTerbilang = Terbilang(INT(tnNum/1e9)) +"Milyar " + Terbilang(tnNum % 1e9)
CASE tnNum < 1e15
lcTerbilang = Terbilang(INT(tnNum/1e12)) +"Triliun " + Terbilang(tnNum % 1e12)
CASE tnNum < 1e18
lcTerbilang = Terbilang(INT(tnNum/1e15)) +"Quadriliun " + Terbilang(tnNum % 1e15)
CASE tnNum < 1e21
lcTerbilang = Terbilang(INT(tnNum/1e18)) +"Pentaliun " + Terbilang(tnNum % 1e18)
ENDCASE
RETURN lcTerbilang
Hasil Penampakan
Langganan:
Postingan (Atom)

..jpg)